BL652 ssd1306とNRF_LOG
SSD1306とNRF_LOGでUART経由でシリアルでPCにデータを送信するのを同時にしてみる。片方づつやるのは簡単で、マージする作業、特に、sdk_configの設定ってが厄介。
\SDK\nRF5_SDK_17.1.0_ddde560\components\drivers_ext
SDKの下の下にcomponets、その下にdrivers_extがあるので
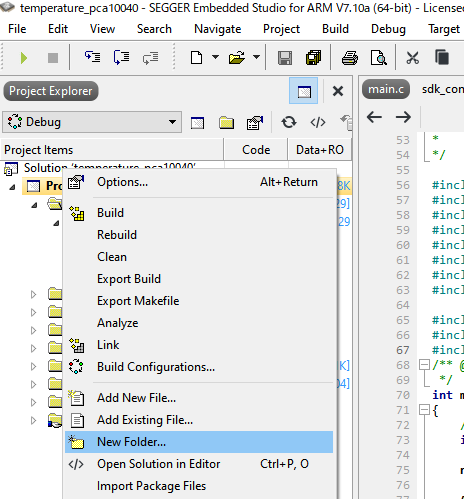
そこにフォルダを追加する。ssd1306。
その下に、nRF用のssd1306 lib(自作)を配置する。
fonts.h
fonts.c
ssd1306.h
ssd1306.c
(テストのためにfun_logo.h)
ここからDLできるようにしておく。
右クリックでAdd Existing fileを選択し、上で配置したfonts.cとssd1306.cを選択する。
../../../../../../components/drivers_ext/ssd1306
を追加する。../../の部分は、他に../../../../../../components/が上にあるので、そこからコピペしてもってくると良い。
インクルードする
mainの上で
// for using I2C
#include "nrf_drv_twi.h"
// for using OLED display with SSD1306
#include "ssd1306.h"
#include "fun_logo.h"
/* TWI instance ID. */
#if TWI0_ENABLED
#define TWI_INSTANCE_ID 0
#elif TWI1_ENABLED
#define TWI_INSTANCE_ID 1
#endif
/* TWI instance. */
const nrf_drv_twi_t m_twi = NRF_DRV_TWI_INSTANCE(0);
mainの中は、
//initialization of SSD1306
SSD1306_Init();
//Initilization of NRF_LOG
APP_ERROR_CHECK(NRF_LOG_INIT(NULL));
NRF_LOG_DEFAULT_BACKENDS_INIT();
while (true)
{
SSD1306_DrawBitmap(0,0,fun_logo_mono128x64, 128, 64, 1);
SSD1306_UpdateScreen();
nrf_delay_ms(2000);
SSD1306_ScrollRight(0x00, 0x0f); // scroll entire screen right
nrf_delay_ms (2000);
SSD1306_ScrollLeft(0x00, 0x0f); // scroll entire screen left
nrf_delay_ms (2000);
SSD1306_Scrolldiagright(0x00, 0x0f); // scroll entire screen diagonal right
nrf_delay_ms (2000);
SSD1306_Scrolldiagleft(0x00, 0x0f); // scroll entire screen diagonal left
nrf_delay_ms (2000);
SSD1306_Stopscroll(); // stop scrolling. If not done, screen will keep on scrolling
SSD1306_InvertDisplay(1); // invert the display
nrf_delay_ms(2000);
SSD1306_InvertDisplay(0); // normalize the display
nrf_delay_ms(2000);
SSD1306_Stopscroll();
SSD1306_Clear();
SSD1306_GotoXY (0,0 );
SSD1306_Puts ("Hello world.", &Font_11x18, 1);
SSD1306_UpdateScreen();
nrf_delay_ms(2000);
SSD1306_Clear();
printf("Hallo printf.\n\r");
NRF_LOG_INFO("Hello NRF_LOG.");
NRF_LOG_FLUSH();
nrf_delay_ms(500);
// Do nothing.
}
}
これをTWI_sacanerとかをベースにやるとすぐ動かす事ができる。
難しいのは、例えばこれをNRF_LOGと一緒に使おうとする事。sdk_configをマージする作業が非常に難しい。dk_config.hを¥config\nrf52832\configにあるものに差し替えてやってから、exampleの下のtemplate.projectをスタートに、まずhttps://funasover.blogspot.com/2023/02/nrf-nrflog.html
と同じ作業をして、NRF_LOGでUART経由でログが吐きだす所までをやる。
よくあるエラーとしては、Multiple definition of・・・
と出る。これは、大抵、LegacyとNRFXの両方をコンパイルしに行って2回宣言せれているよというエラーなので、sdk_configのチェックを片方に寄せてあげることをする。
すべて記録する事もできず・・・
ここにNRF_LOGと、I2Cの両方を使えるテンプレートを置いておく。


コメント
コメントを投稿