nRF Timer
Timerのペリフェラルを使ってみる。
Timer0...4までの32ビットのタイマーが5つ搭載されている。
ヘッダーファイル
//To use Timer
#include "nrf_drv_timer.h"
インスタンス
const nrf_drv_timer_t Mytimer0 = NRF_DRV_TIMER_INSTANCE(0);
おまじない的にincludeの下に配置する。
タイマーを例えば3つ使う場合は、
const nrf_drv_timer_t Mytimer0 = NRF_DRV_TIMER_INSTANCE(0);
const nrf_drv_timer_t Mytimer1 = NRF_DRV_TIMER_INSTANCE(1);
const nrf_drv_timer_t Mytimer2 = NRF_DRV_TIMER_INSTANCE(2);
タイマーの設定
nrf_drv_timer_config_t timer_cfg = NRF_DRV_TIMER_DEFAULT_CONFIG;
タイマーの設定する構造体 ここではtimer_cfgと名前をつけてやる。
設定は、NRF_DRV_TIMER_DEFAULT_CONFIGと記載する。
途中まで入力すると候補が出てくるので選択する。NRF_DRV_TIMER_DEFAULT_CONFIGの定義を見にいくと・・
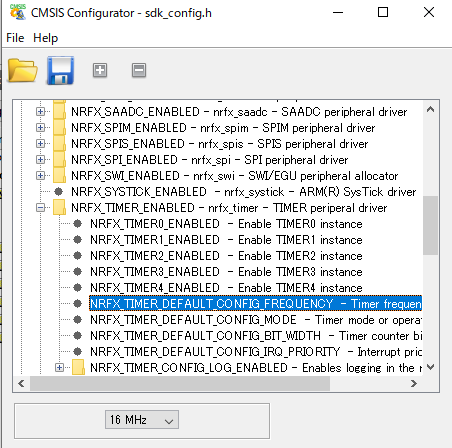
NRFX_TIMER_DEFAULT_CONFIG_FREQUENCYなどに設定されているのが確認できる。
このNRFX_TIMER_DEFAULT_CONFIG_FREQUENCYとかは、sdk_configファイルの中で設定できる。
まずはデフォルトの数字のまま進めるが、各チェックの内容を確認しておく。
タイマーの初期化
uint32_t err_code;
err_code = nrf_drv_timer_init(&Mytimer0, &timer_cfg, timer_event_handler);
APP_ERROR_CHECK(err_code);
エラー変数を宣言してあげて、nrf_drv_timer_initで初期化する。
第一引数は、上で宣言したインスタンスをポインタで
第二引数は、先ほど設定した設定構造体を指定、次に作るがイベントハンドラーの関数の中に一定時間で処理する内容を記載する。ここではハンドラー関数の名前だけを決めておく。
タイマーの設定2
uint32_t time_ms=1000;
uint32_t time_ticks;
time_ticks = nrf_drv_timer_ms_to_ticks(&Mytimer0, time_ms);
nrf_drv_timer_extended_compare(
&Mytimer0, NRF_TIMER_CC_CHANNEL0, time_ticks, NRF_TIMER_SHORT_COMPARE0_CLEAR_MASK, true);
nrf_drv_timer_enable(&Mytimer0);
nrf_drv_timer_ms_to_ticksの関数は便利な関数で、msを指定してやると必要なカウント数に変換してくれる関数。
nrf_drv_timer_extended_compare
第一引数:インスタンスのポインタ p_instance Pointer to the driver instance structure.
第二引数:比較するチャンネル
第三引数:比較する値
cc_value Compare value.
第四引数:タイマーのマスク チャンネル上の比較イベントとタイマータスク(STOPまたはCLEAR)の間のショートカット。コンペアするとかいろいろあるが、単純に時間をの時は、NRF_TIMER_SHORT_COMPARE0_CLEAR_MASKとしておく。
第五引数 タイマーの割り込みをEnableにするかの設定。
nrf_drv_timer_enable(&Mytimer0);
実際にこのコマンドでタイマーが稼働しはじめる。
タイマーハンドラー関数
後回しにしていたハンドラーの関数。mainの上側に、ハンドラーの関数を定義する。
//For using GPIO
#include "nrf_gpio.h"
を記述しておく。
またmainの中で、
//Initilization GPIO
nrf_gpio_cfg_output(26);
とLEDを使えるようにしておく。ここでは26番ピン(XAIOのLEDの赤)。
mainの外側で
void timer_event_handler(nrf_timer_event_t event_type, void* p_context)
{
switch (event_type)
{
case NRF_TIMER_EVENT_COMPARE0:
nrf_gpio_pin_toggle(26);
break;
default:
//Do nothing.
break;
}
}
ちゃんと動いていれば点滅する。
以下がソースコード全般。大抵動かない時にsys_configのチェックの問題。
#include <stdbool.h>
#include <stdint.h>
#include "nrf.h"
#include "nordic_common.h"
#include "boards.h"
#include "nrf_delay.h"// for using nrf_delay
//To use nrf_log, add three include files.
#include "nrf_log.h"
#include "nrf_log_ctrl.h"
#include "nrf_log_default_backends.h"
//For using GPIO
#include "nrf_gpio.h"
//for using Timer
#include "nrf_drv_timer.h"
const nrf_drv_timer_t Mytimer0 = NRF_DRV_TIMER_INSTANCE(0);
void timer_event_handler(nrf_timer_event_t event_type, void* p_context)
{
switch (event_type)
{
case NRF_TIMER_EVENT_COMPARE0:
nrf_gpio_pin_toggle(26);
break;
default:
//Do nothing.
break;
}
}
/**
* @brief Function for application main entry.
*/
int main(void)
{
//Initilization of NRF_LOG
APP_ERROR_CHECK(NRF_LOG_INIT(NULL));
NRF_LOG_DEFAULT_BACKENDS_INIT();
//Initilization GPIO
nrf_gpio_cfg_output(26);
//Timer configration
nrf_drv_timer_config_t timer_cfg = NRF_DRV_TIMER_DEFAULT_CONFIG;
//Initializatio of timer
uint32_t err_code;
err_code = nrf_drv_timer_init(&Mytimer0, &timer_cfg, timer_event_handler);
APP_ERROR_CHECK(err_code);
//Timer comparation and start
uint32_t time_ms=1000;
uint32_t time_ticks;
time_ticks = nrf_drv_timer_ms_to_ticks(&Mytimer0, time_ms);
nrf_drv_timer_extended_compare(
&Mytimer0,
NRF_TIMER_CC_CHANNEL0,
time_ticks,
NRF_TIMER_SHORT_COMPARE0_CLEAR_MASK,
true);
//start timer
nrf_drv_timer_enable(&Mytimer0);
while (true)
{
__WFI();
}
}
/** @} */


コメント
コメントを投稿